


Author: Gujarat Information
-
Future Greens Vadodara
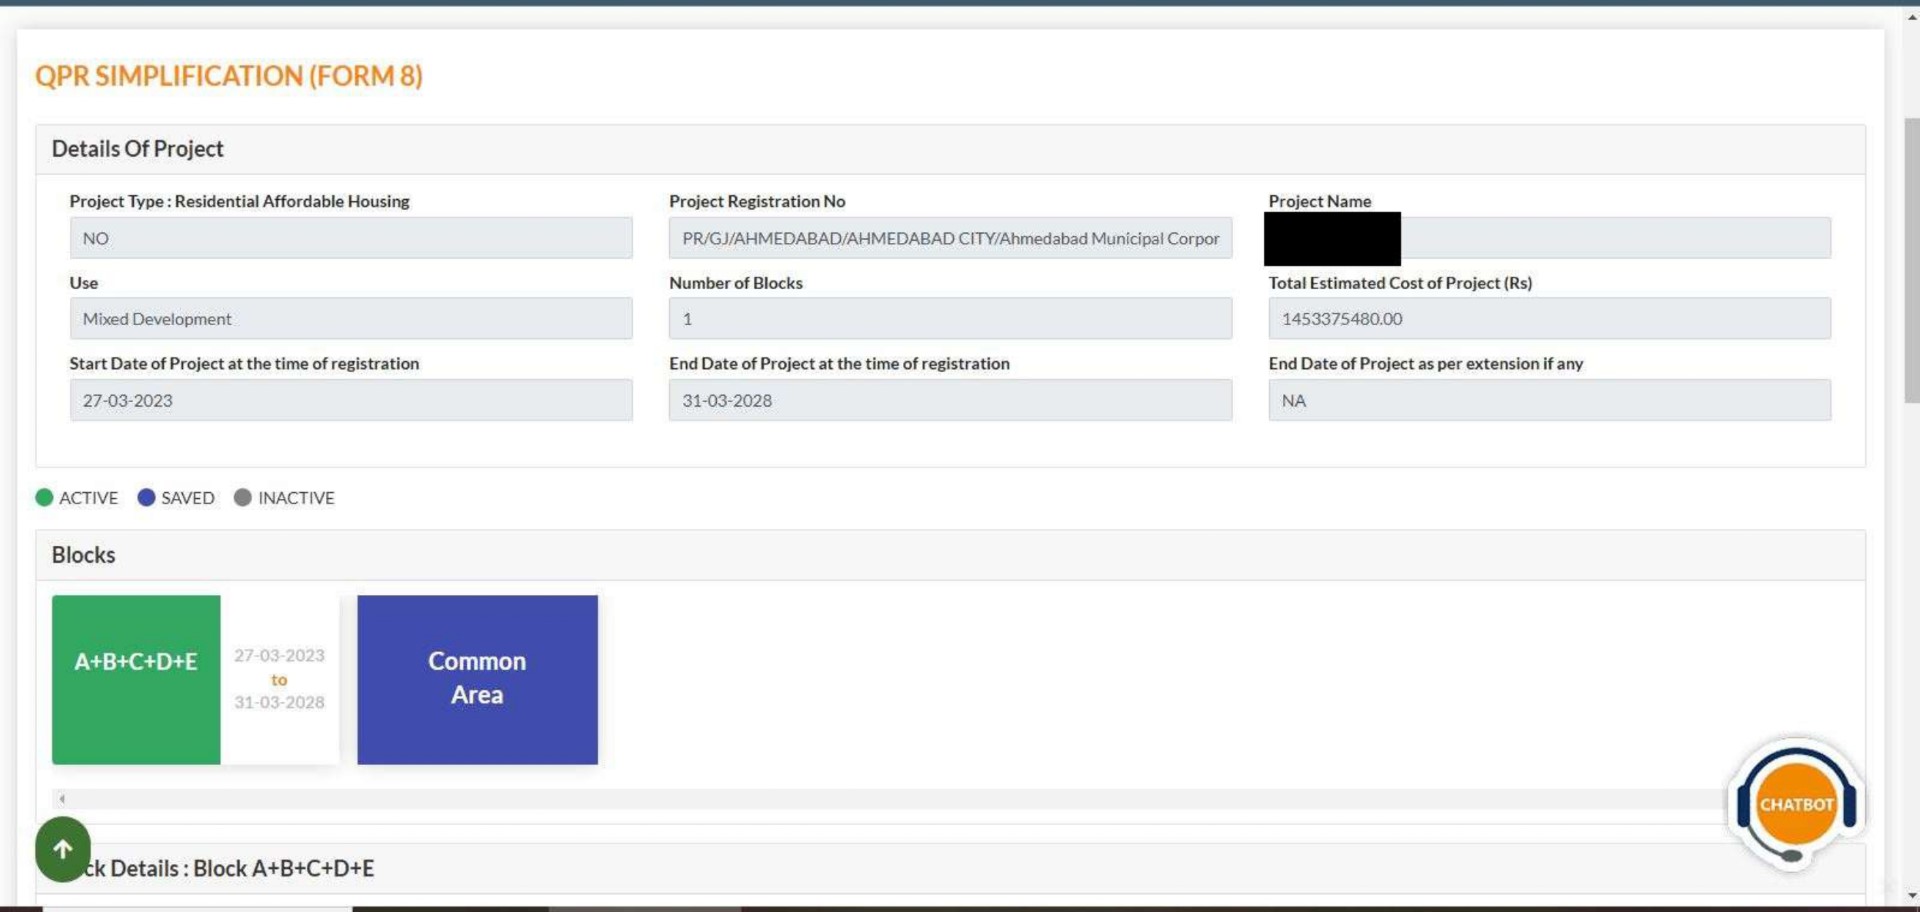
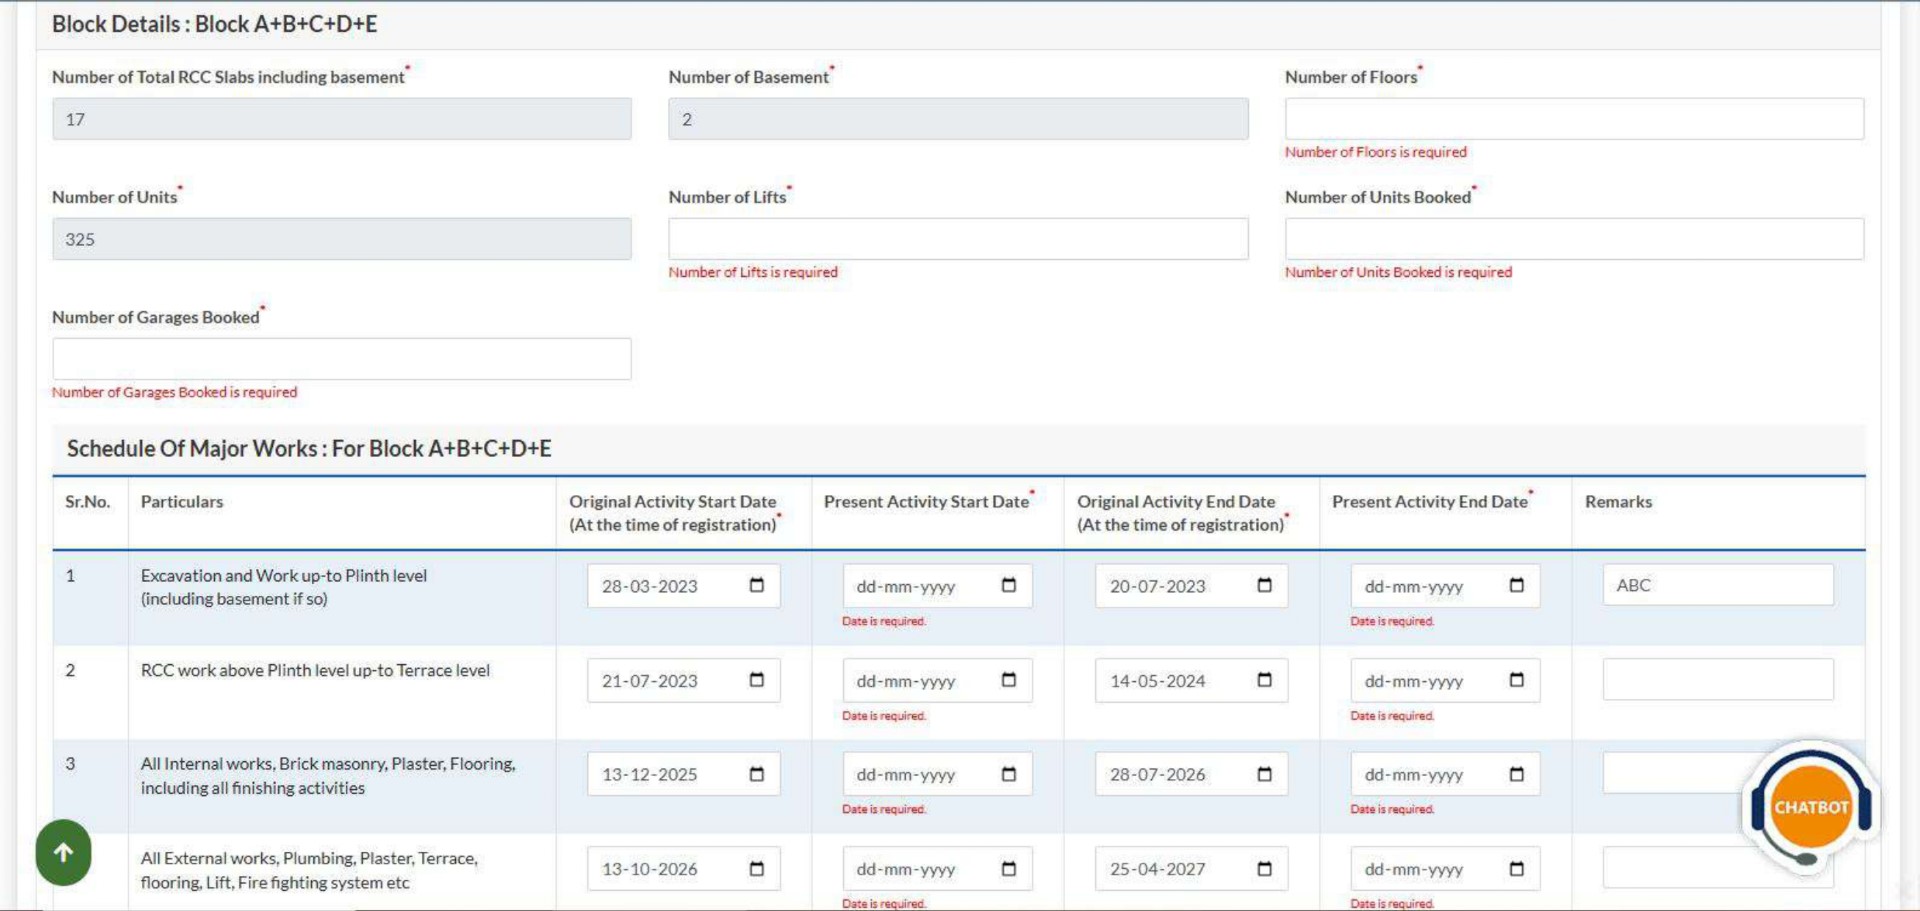
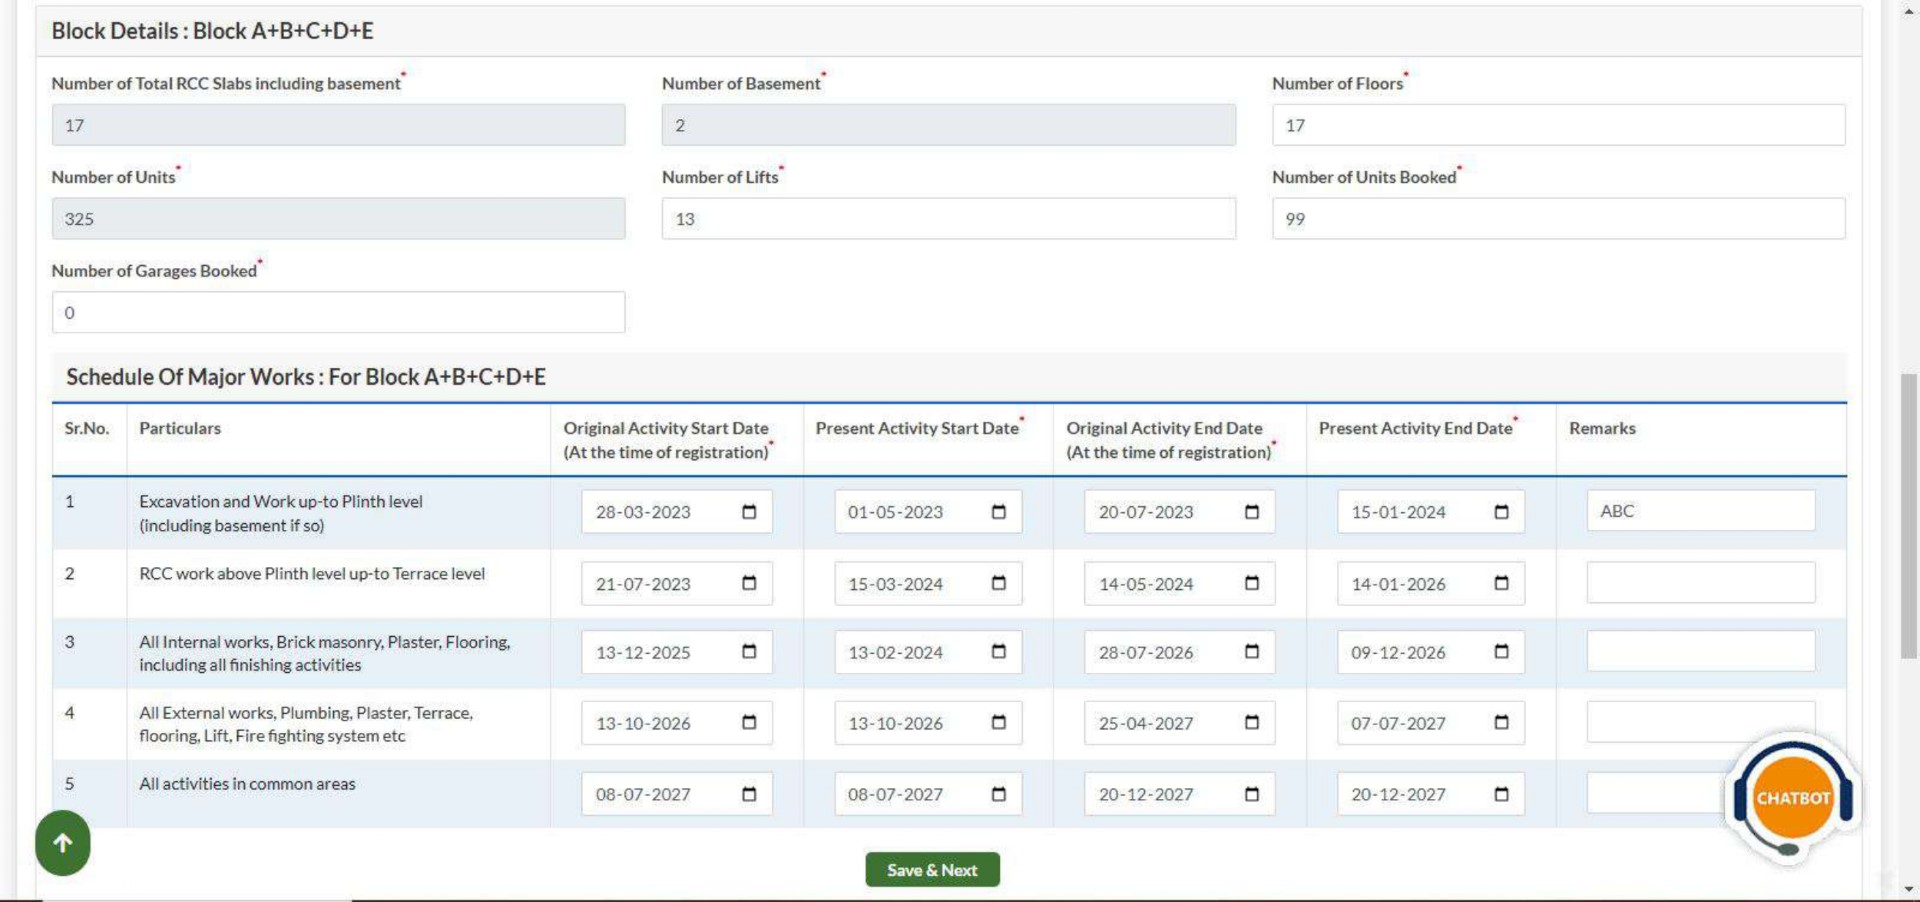
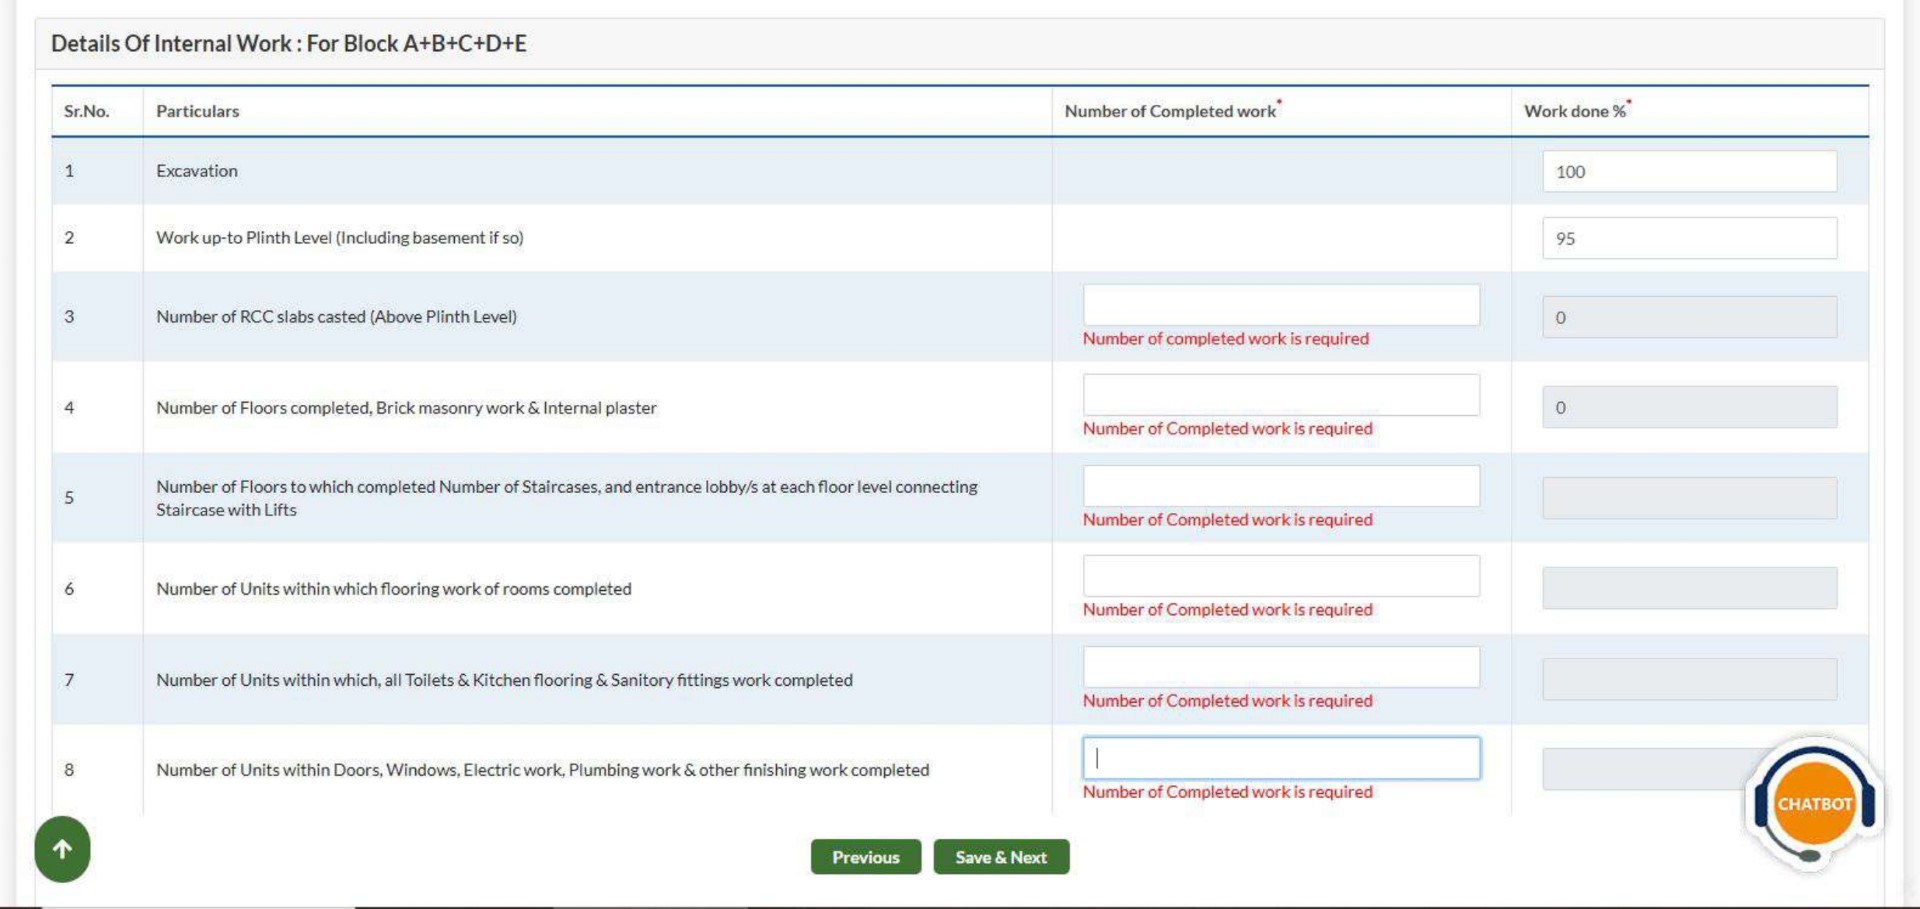
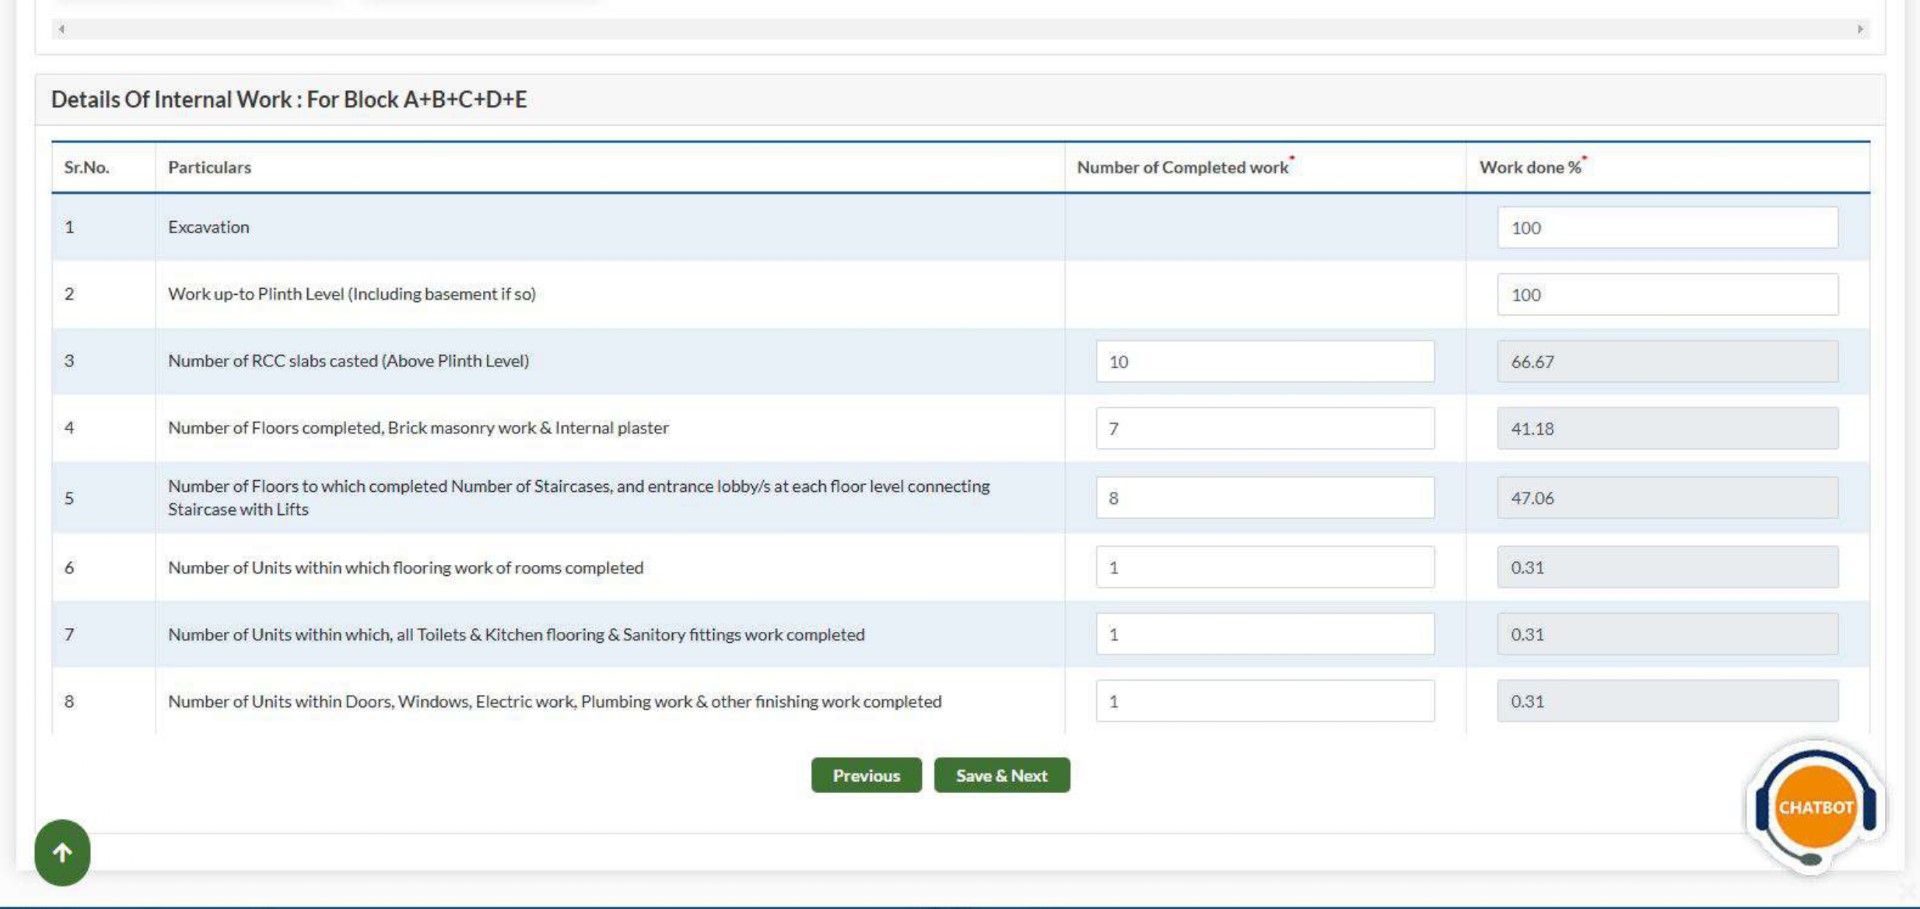
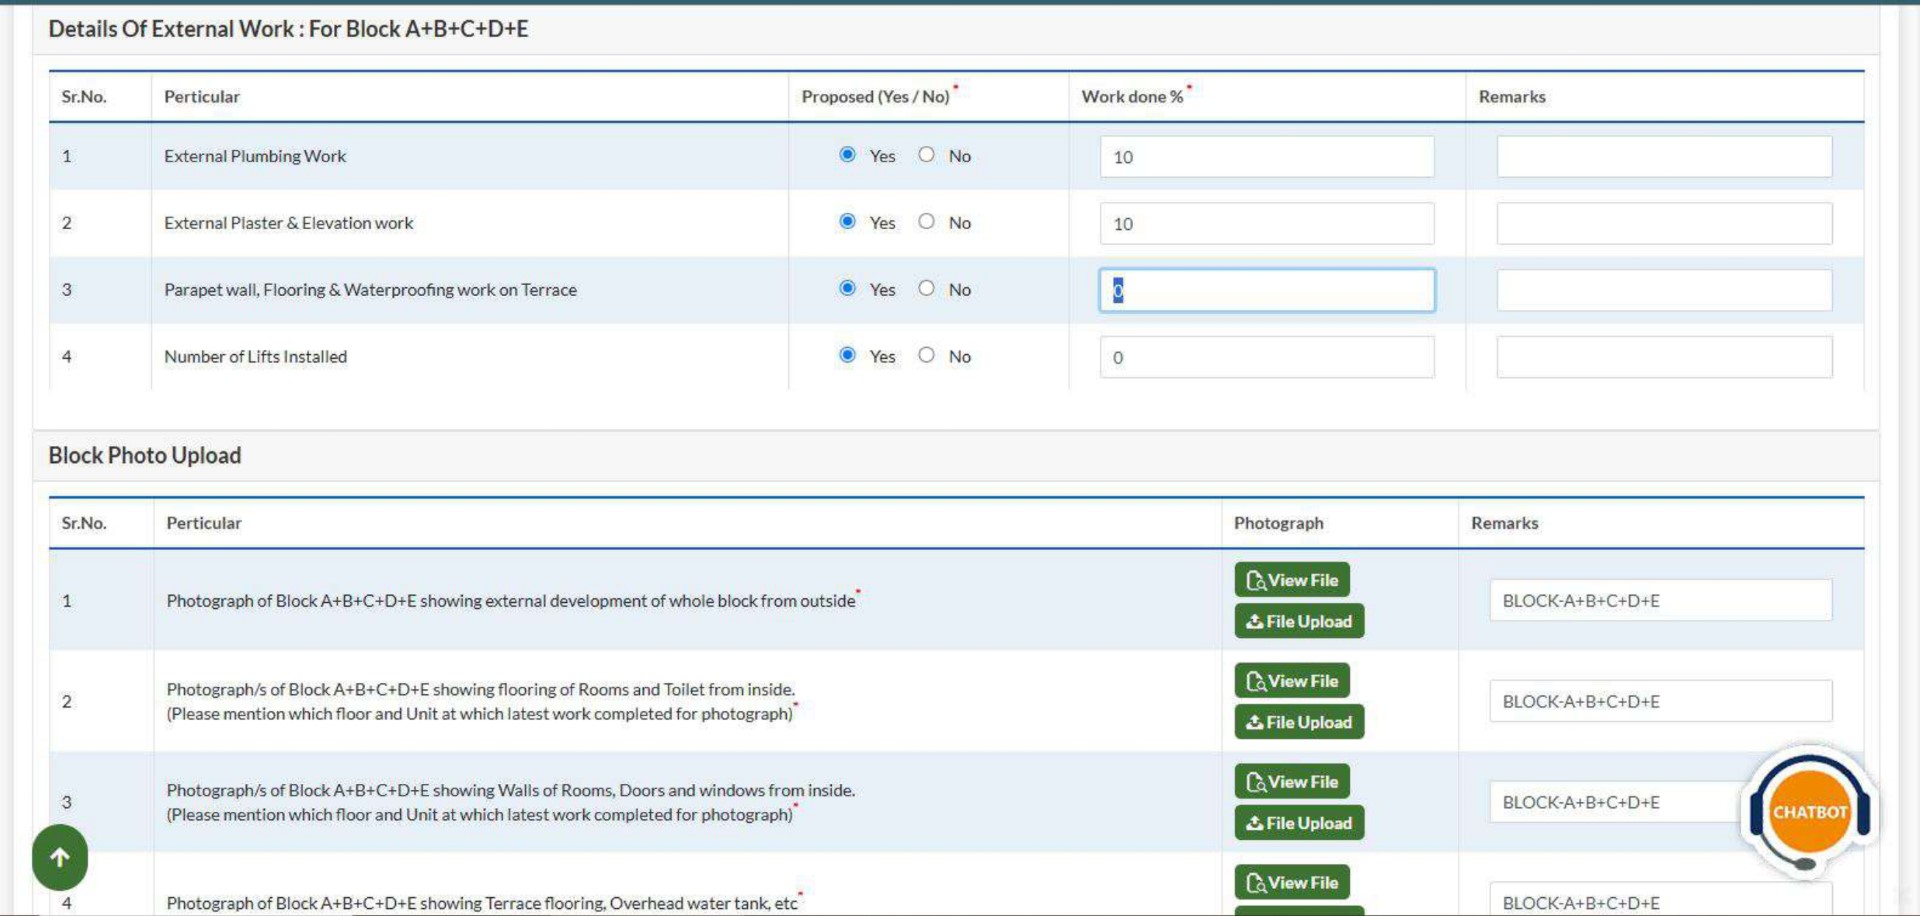
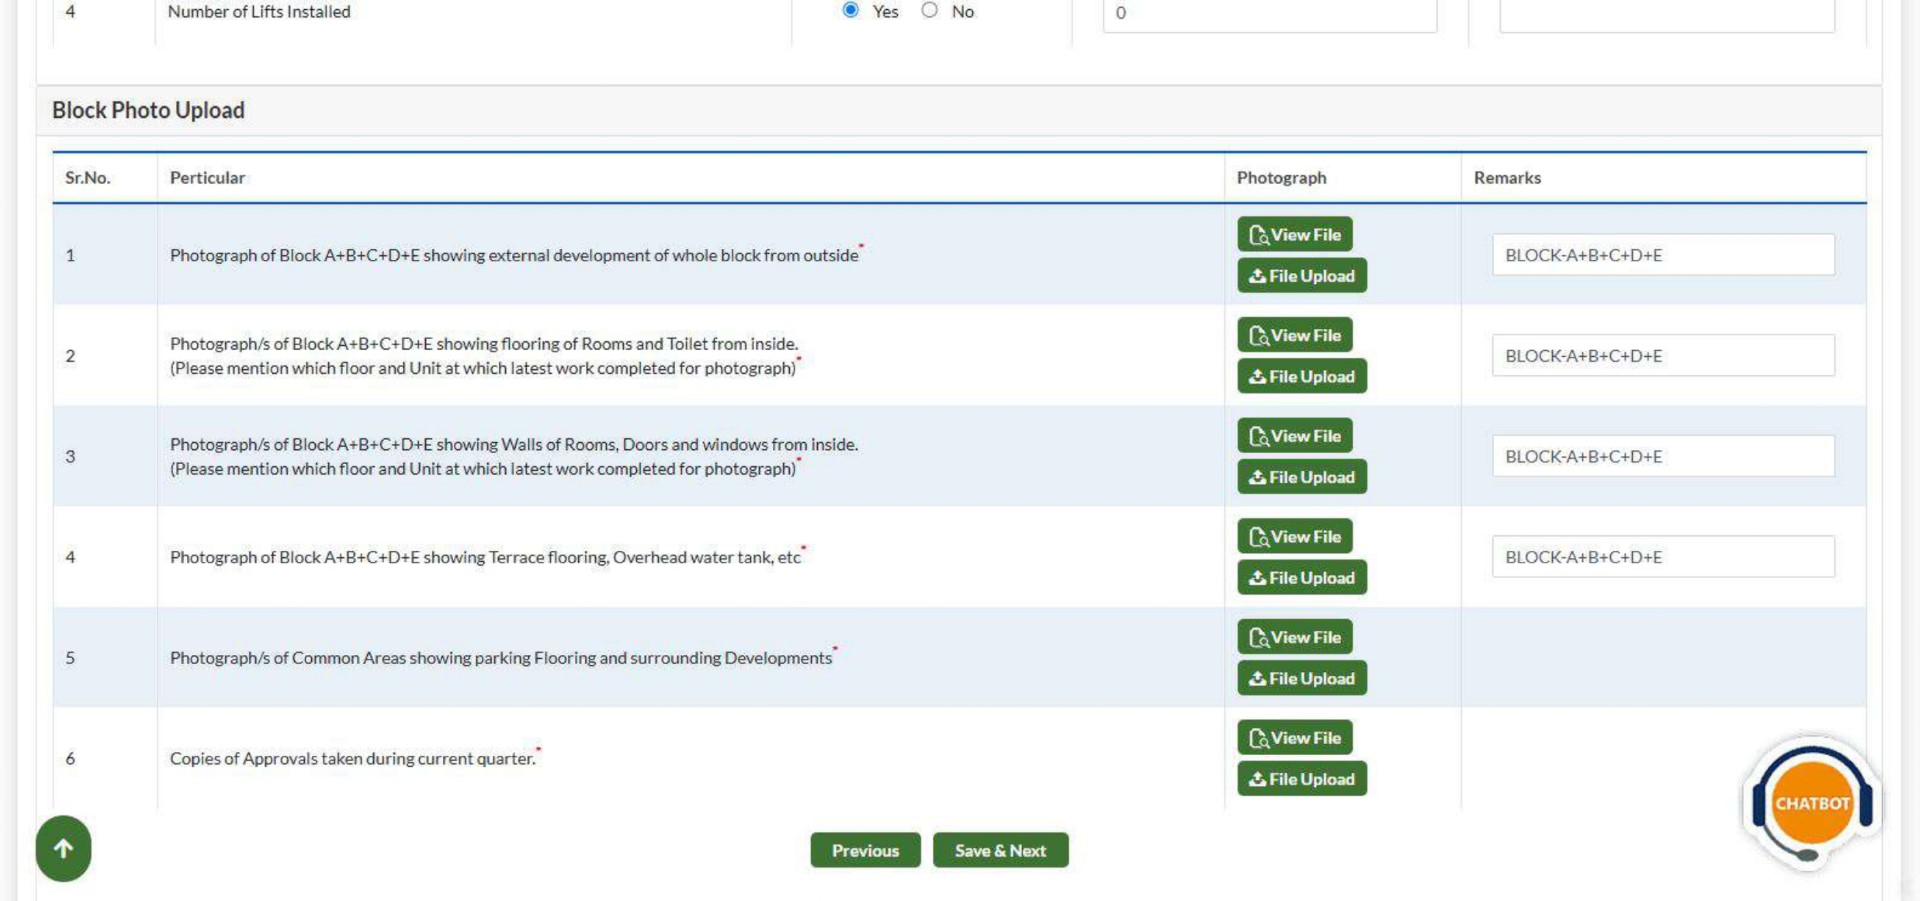
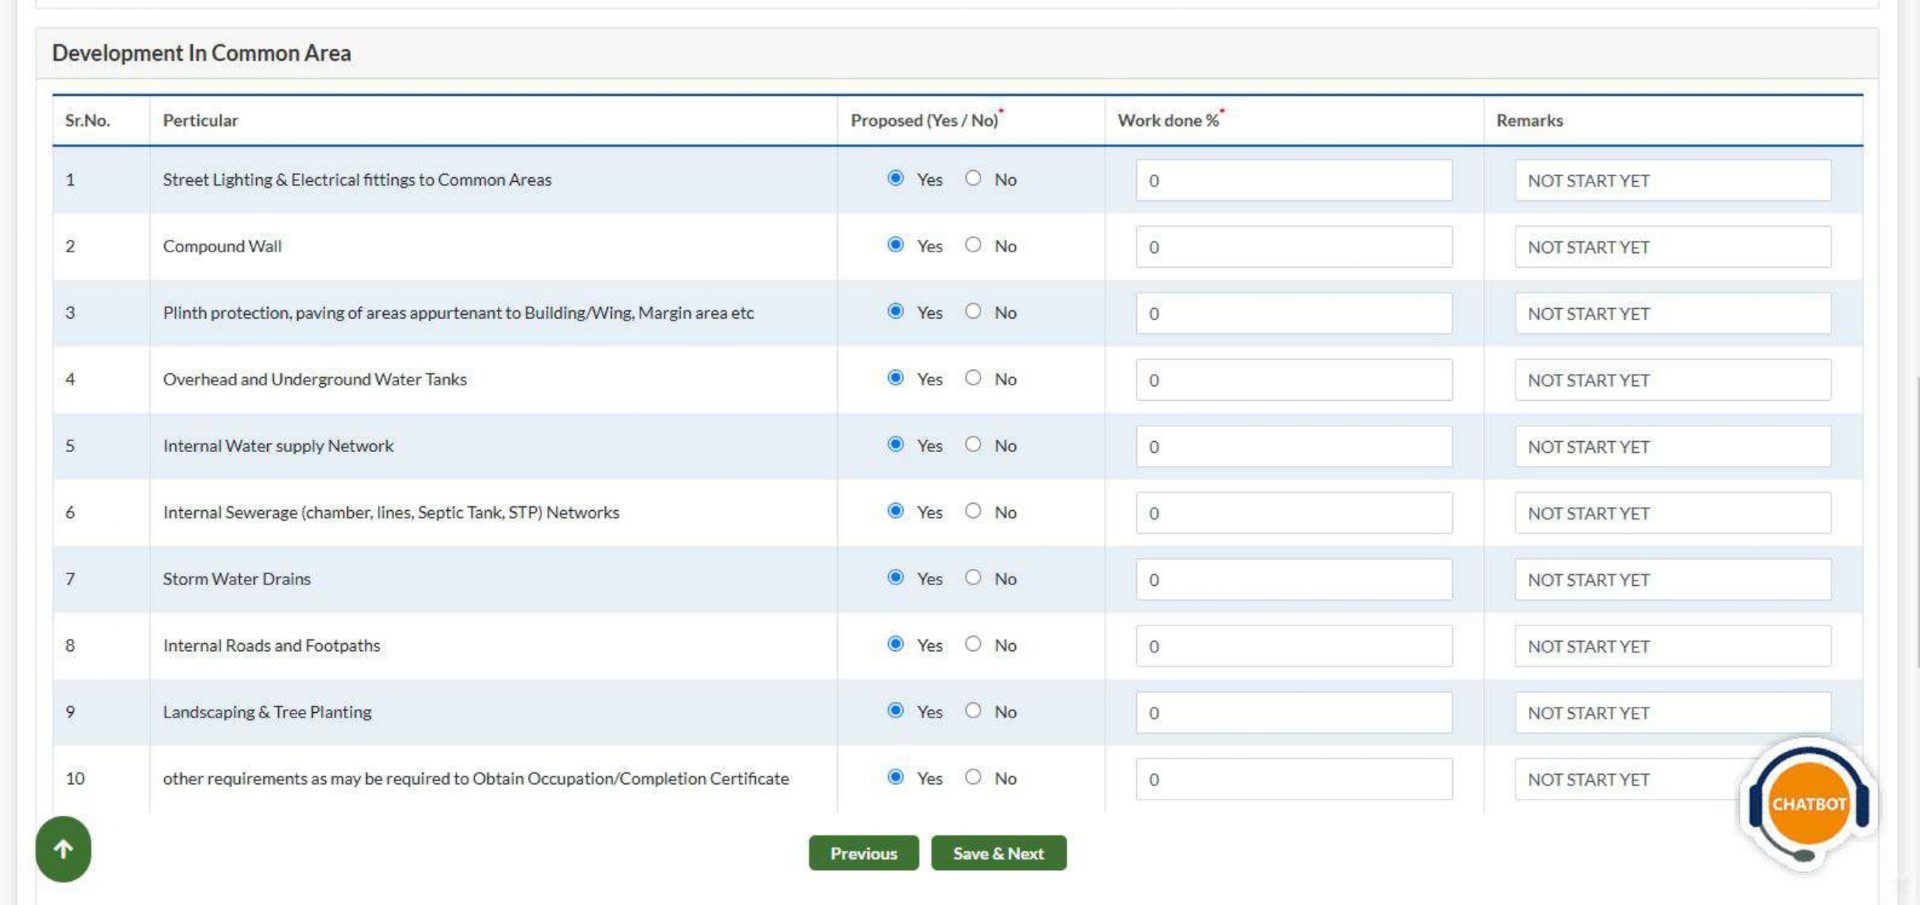
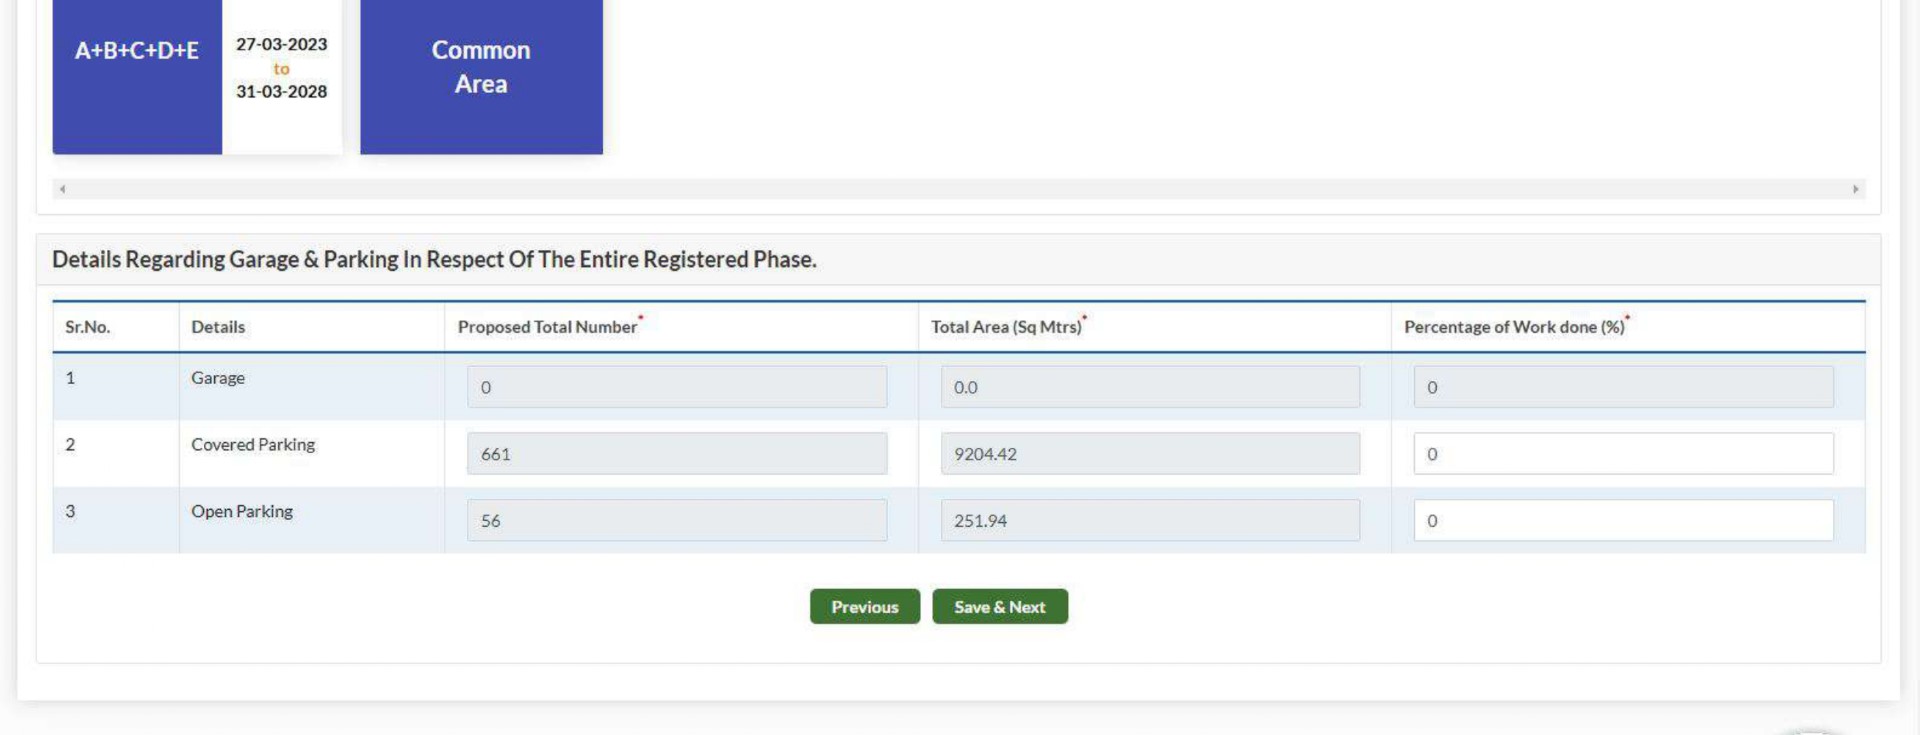
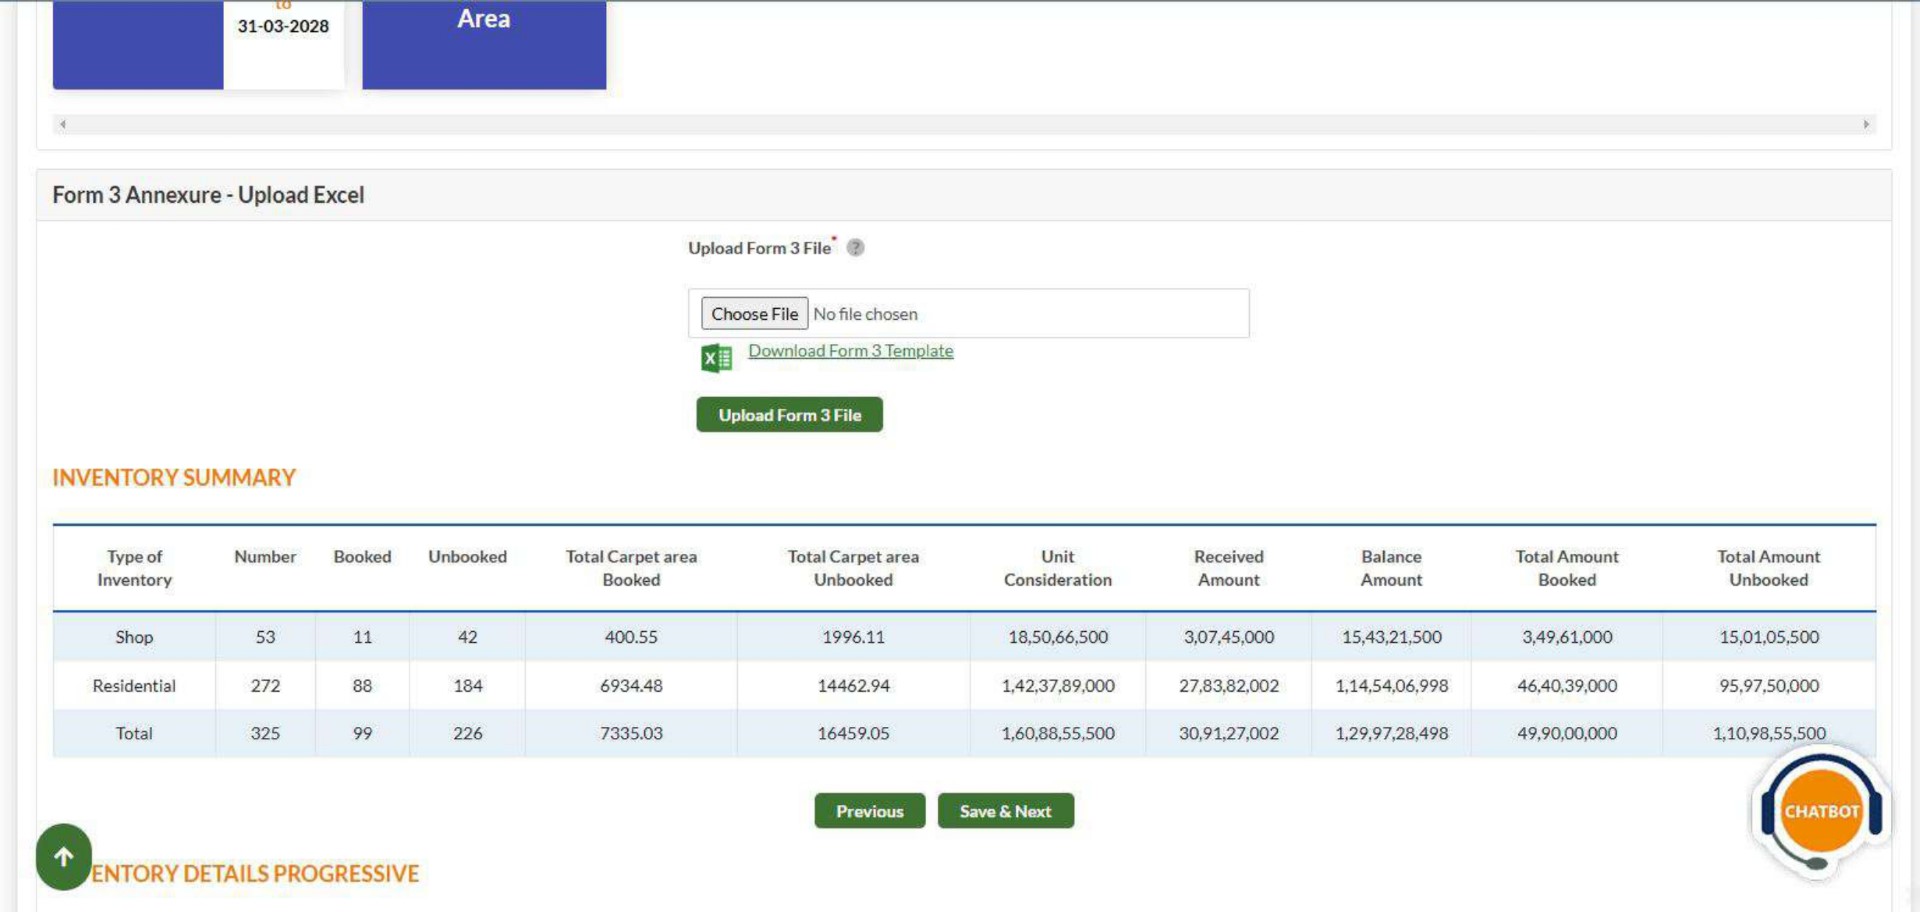
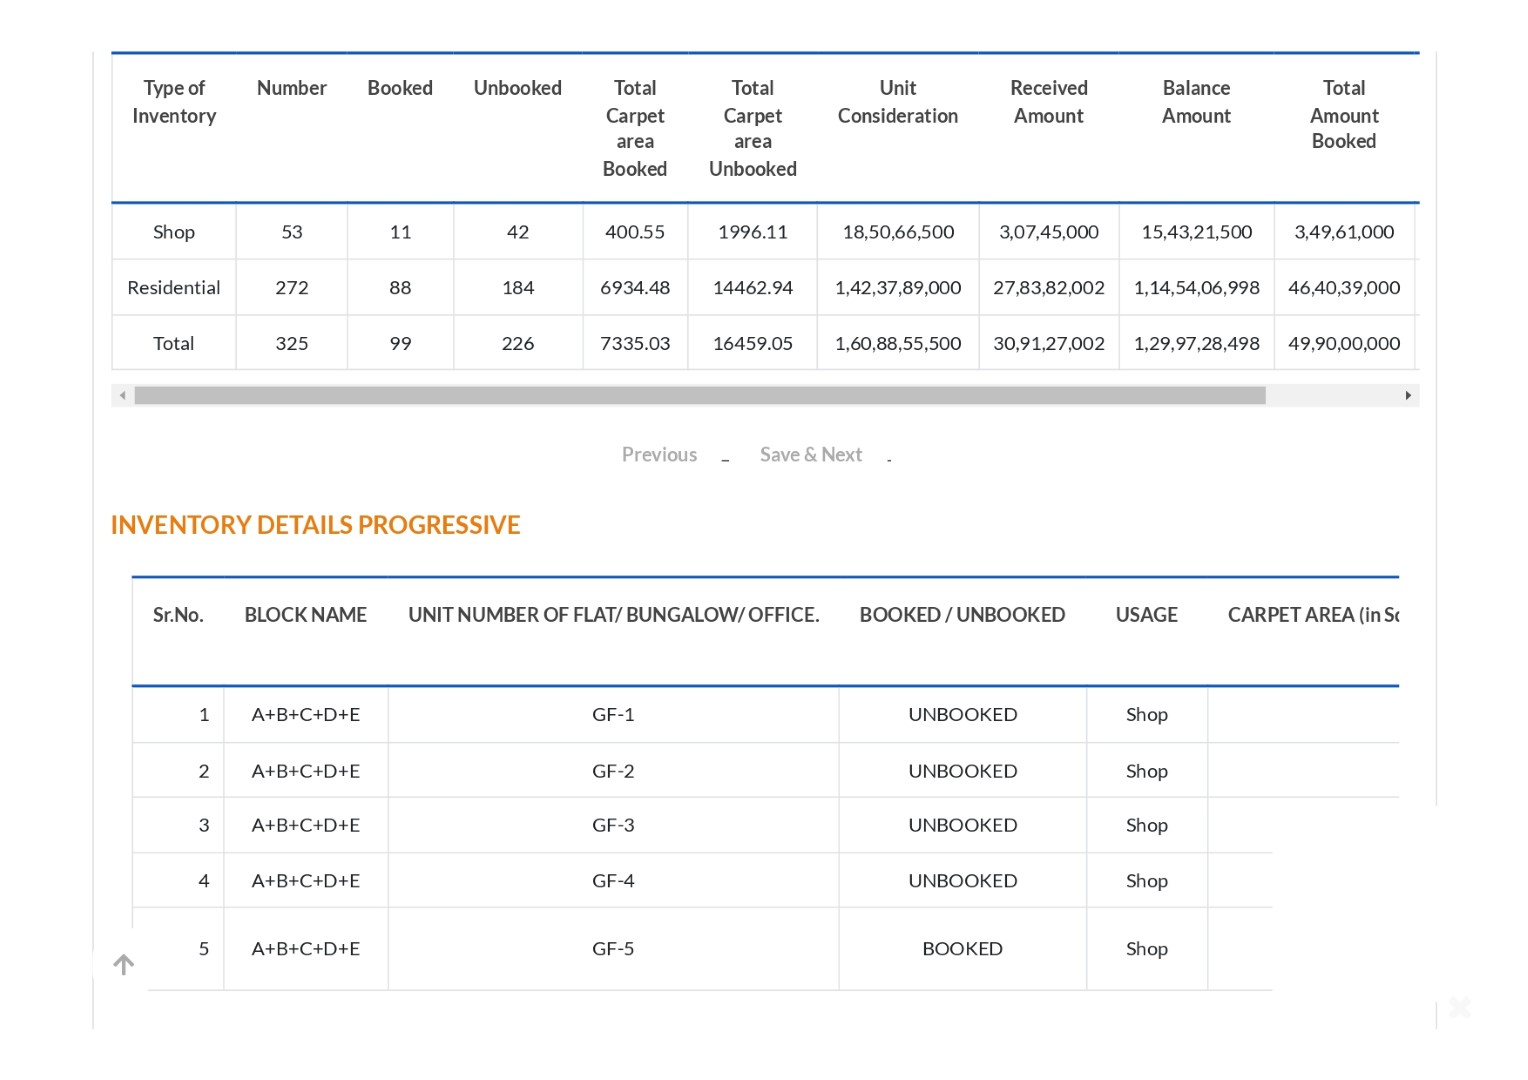
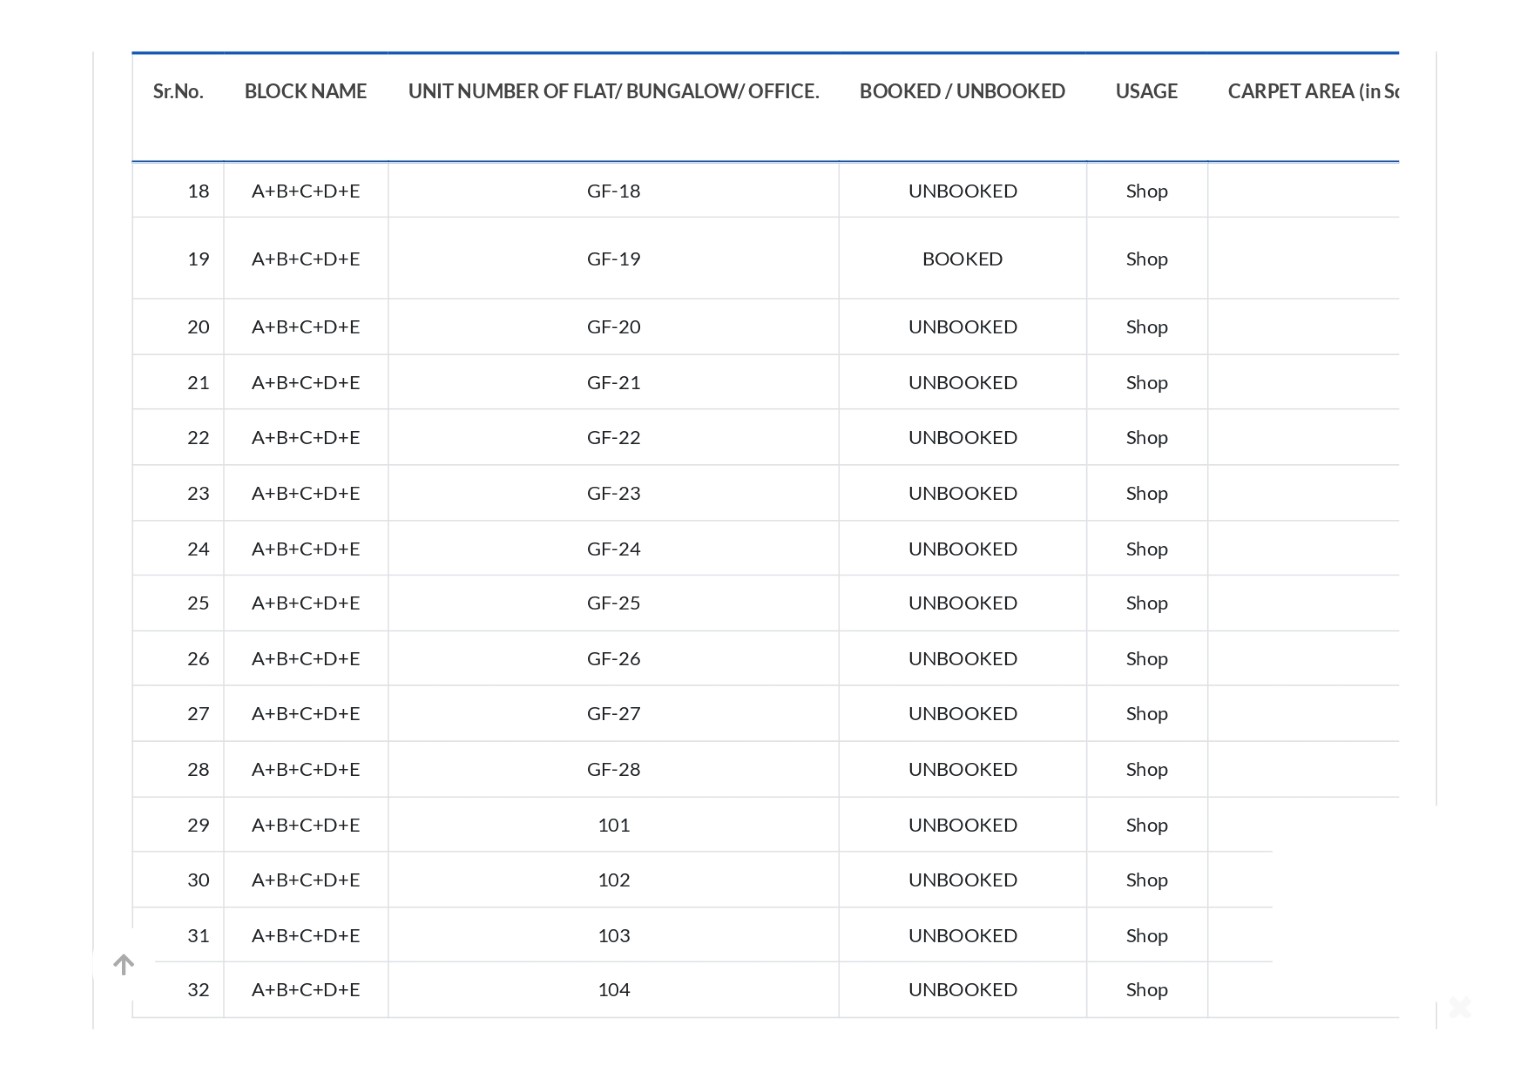
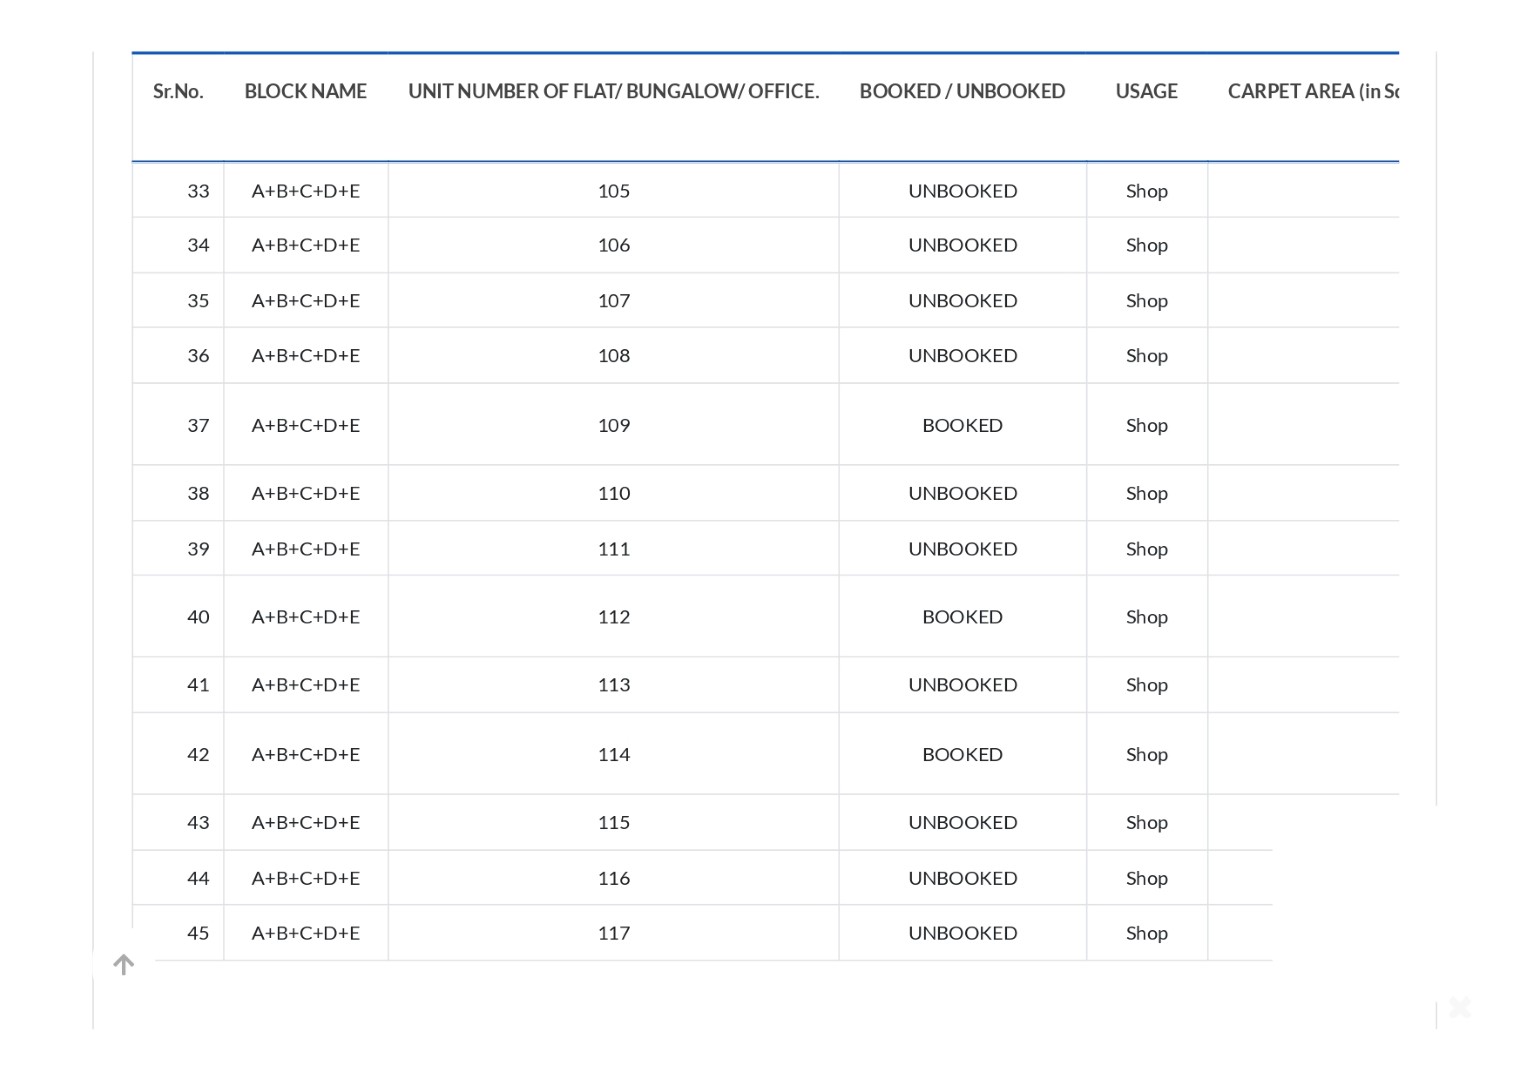
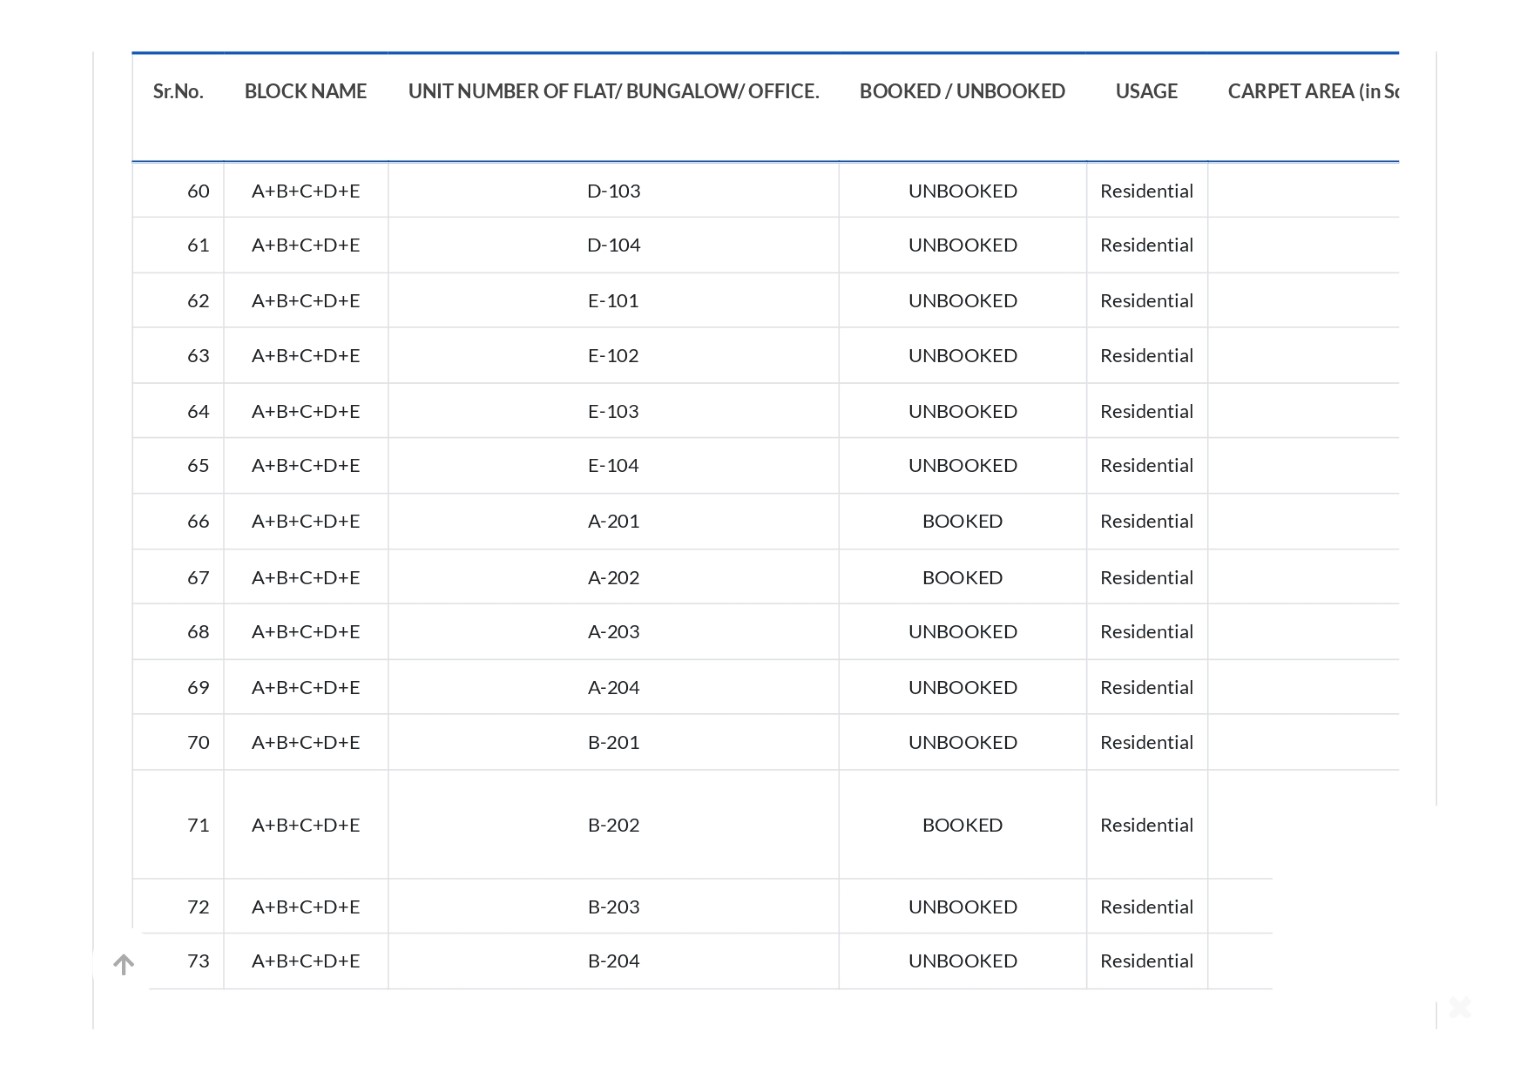
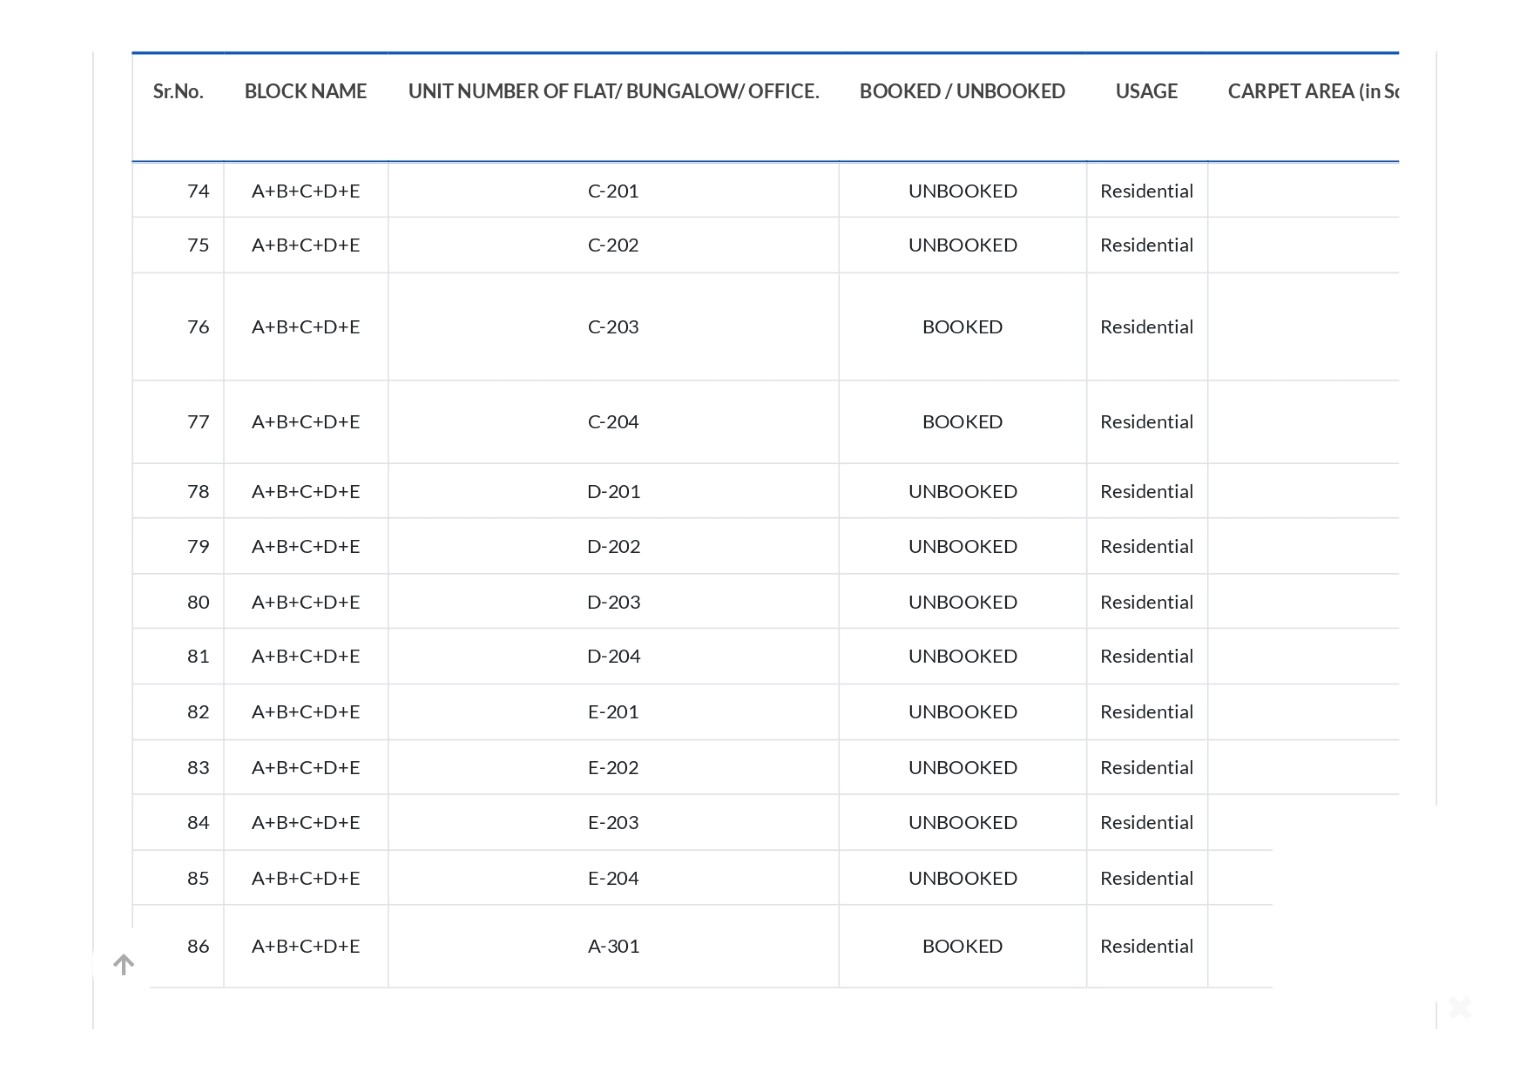
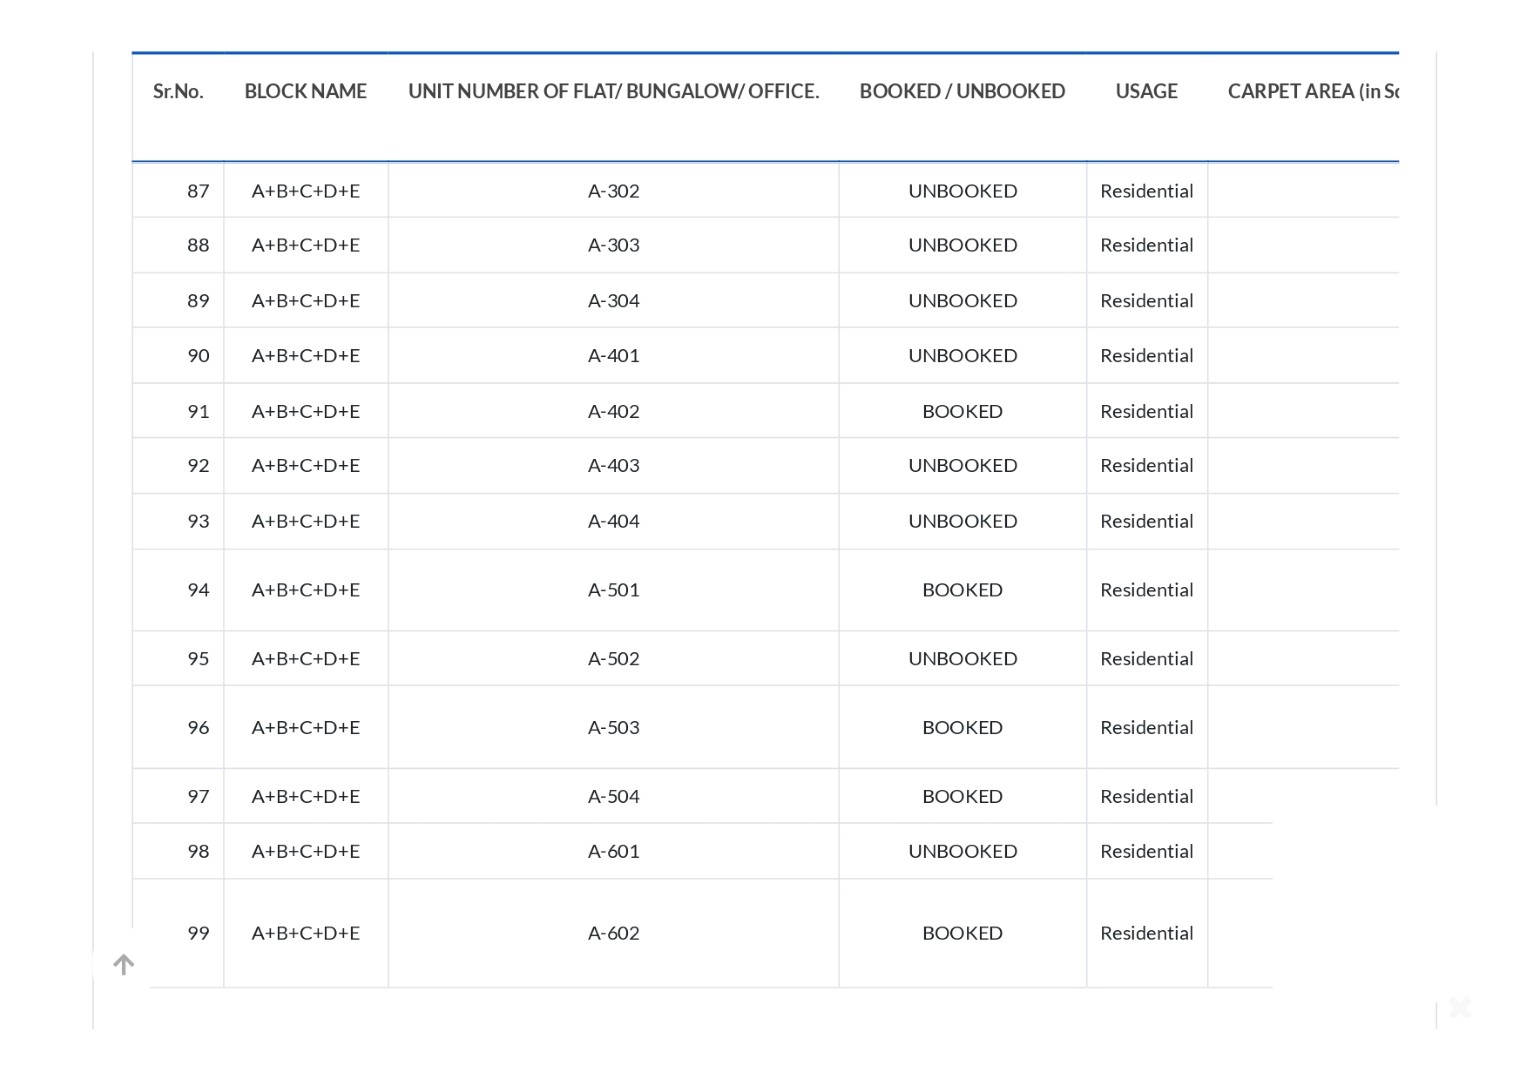
Future Greens by Future BuildconFuture Greens is Residential/Group Housing Project – Construcation Of 77 Residential Unit Under Single Phase
Address: Future Greens,Behind To Swami Vatika Vadadla-Tarsali Road , Vadodara
Architect – Mahesh Lavjibhai Rathod and Engineer Ami Desai
Promoter Future Buildcon Promoter Type Partnership Firm Site Address Future Greens,Behind To Swami Vatika Vadadla-Tarsali Road , Vadodara Architect Mahesh Lavjibhai Rathod – 22.24549933 Engineer Ami Desai – 75 Promoter Name Amit Savani GUJRERA Website https://gujrera.gujarat.gov.in/ GUJRERA Reg. No PR/GJ/VADODARA/VADODARA/Vadodara Municipal Corporation/RAA14724/240125/311229 Start Date 29-June-2024 End Date 31-December-2029 Promoter
Amit Savani
-
Terra Sky Gandhinagar
Terra Sky by Cs Infraspace Llp
Terra Sky is Mixed Development Project – Residing In The Cloudspace
Address: Terra Sky, 36 Mtr Road, Nr. Savitaabaa Circle, Behind Hillock Hotel, Zundal, Gandhinagar , Gandhinagar
Architect – Harsh Manishkumar Raval and Engineer Yaminiben Akashkumar Parmar
Promoter Cs Infraspace Llp Promoter Type Limited Liability Partnership Firm Site Address Terra Sky, 36 Mtr Road, Nr. Savitaabaa Circle, Behind Hillock Hotel, Zundal, Gandhinagar , Gandhinagar Architect Harsh Manishkumar Raval – 23.14186333 Engineer Yaminiben Akashkumar Parmar – 001ERH10112510130 Promoter Name Ajay Chaudhari GUJRERA Website https://gujrera.gujarat.gov.in/ GUJRERA Reg. No PR/GJ/GANDHINAGAR/GANDHINAGAR/Gandhinagar Municipal Corporation/MAA14727/240125/311228 Start Date 13-December-2024 End Date 31-December-2028 Promoter
Ajay Chaudhari
-
Palm Excellencia Surat
Palm Excellencia by Jay Geegev RealtyPalm Excellencia is Residential/Group Housing Project – 88 Flat & 8 Flat Penthouse
Address: “Palm Excellencia”, T.P.S. No. 25 (Mota Varachha), Block No. 32/A, O.P. No.- 122/A,F.P. No. -122/A, Mota Varachha, Surat , Surat
Architect – Dimple Padmshibhai Mordiya and Engineer Ankit Mukundbhai Kumbhani
Promoter Jay Geegev Realty Promoter Type Partnership Firm Site Address “Palm Excellencia”, T.P.S. No. 25 (Mota Varachha), Block No. 32/A, O.P. No.- 122/A,F.P. No. -122/A, Mota Varachha, Surat , Surat Architect Dimple Padmshibhai Mordiya – 21.24958082 Engineer Ankit Mukundbhai Kumbhani – 1116ERH19032903291088 Promoter Name Shrey Dudhat GUJRERA Website https://gujrera.gujarat.gov.in/ GUJRERA Reg. No PR/GJ/SURAT/CHORYASI/Surat Municipal Corporation/RAA14723/240125/311229 Start Date 16-December-2024 End Date 31-December-2029 Promoter
Shrey Dudhat
-
Shantikunj Residency 2 Vadodara
Shantikunj Residency 2 by Shantikunj EnterpriseShantikunj Residency 2 is Residential/Group Housing Project – Total 72 Residential Duplex & Tenament
Address: Na, Vadodara
Architect – Abhilash Ketankumar Pandya and Engineer Nitin Suresh Kapadi
Promoter Shantikunj Enterprise Promoter Type Partnership Firm Site Address Na, Vadodara Architect Abhilash Ketankumar Pandya – 22.0663818 Engineer Nitin Suresh Kapadi – VMC-EOR-(LR)-37 Promoter Name Virat Satasiya GUJRERA Website https://gujrera.gujarat.gov.in/ GUJRERA Reg. No PR/GJ/VADODARA/KARJAN/Karjan Municipality/RAA14720/230125/301229 Start Date 01-December-2024 End Date 30-December-2029 Promoter
Virat Satasiya
-
Shivant Arena Surat
Shivant Arena by Maruti EnterpriseShivant Arena is Residential/Group Housing Project – Residential Flats
Address: Block No. 95/A, T.P.S.No 85 (Sarthana-Pasodara-Laskana),F.P No.87/Sub Plot No-2,City Survey No. Na95/A/2, Village: Sarthana, Tal. Surat City, Surat., Surat
Architect – Haniket Umeshbhai Patel and Engineer Divyesh Kishorbhai Gediya
Promoter Maruti Enterprise Promoter Type Partnership Firm Site Address Block No. 95/A, T.P.S.No 85 (Sarthana-Pasodara-Laskana),F.P No.87/Sub Plot No-2,City Survey No. Na95/A/2, Village: Sarthana, Tal. Surat City, Surat., Surat Architect Haniket Umeshbhai Patel – 21.23352952 Engineer Divyesh Kishorbhai Gediya – TDO/ER/1808 Promoter Name Pareshbhai Mandani GUJRERA Website https://gujrera.gujarat.gov.in/ GUJRERA Reg. No PR/GJ/SURAT/SURAT CITY/Surat Municipal Corporation/RAA14721/230125/300629 Start Date 04-May-2024 End Date 30-June-2029 Promoter
Pareshbhai Mandani